
While Meyer is more specific than most German masters on the topic of footwork, there is still a lot left unsaid within his various texts on how and where one should move. Throughout the text, though, he does provide at least some diagramatic assistance on footwork, generally scattered throughout his illustrations.
One of the most useful diagrams is the divided circle as seen in the dussack plate below:
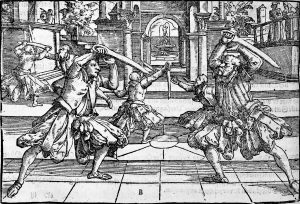
The two figures in the centre of this image are seen standing on a concentric circles divided into octants. The fencer on the left (who is the active participant in the text description which refers to this image) has his leading right foot at the edge of the inner circle, and his rear leg on the outside circle at the first octant line below the horizontal. We know from the text that the fencer has stepped this left foot across in a triangle step to perform a hanging guard, and as such the diagram provides us some useful guidelines for footwork; in this case that a triangle step in this instance steps one octant around to the fencer’s right.
We can create our own diagram with equivalent overall proportions ourselves, and this can become a useful teaching tool for footwork basics.

Here we’re in a right leg lead, and we see that the trailing leg is on the outer circle, while the leading leg is on the inner circle. Now we have this starting position we can propose, using these proportions, other foot movements. I’ve summarised some of Meyer’s footwork as described in his 1570 text below as sequential images, for demonstration purposes.
Passing Step:
The simplest of the steps; interestingly, given Meyer’s proportions for this circle, the passing step steps over the central circle with the lead foot so that the fencer is now centred in the circle. A second step would take their lead foot to the opposite edge of the outer circle while the rear would rest on the inner circle. This means the large circle must be about three paces across, which gives us an approximate measure.

Double Triangle Step:
The double triangle step moves around the central circle by traversing the radial lines, first with the rear foot (a single triangle step), then with the lead foot (for the double triangle step).
Rear Leg Gathering Step:
Using the proportions of the circle and maintaining the distance between the feet in the stance we find that the gathering step advances just over the centre line of the circles, giving just enough reach to attack someone outside the large circle.
Rear Leg Stolen Step:
The rear leg stolen step moves us forward to threaten a gathering, then back again to distance. In doing so we bring ourselves to the border of the inner circle then step backward. The opposite stolen step – an evasion with the lead leg – would withdraw back to the outer circle, then step back in to attack.

Description, NOT Implementation:
These diagrams are useful when teaching the movement, and a diagram like this on the floor of the training area can be extremely useful.
It’s important to remember, however, that trying to learn footwork in isolation has limited utility. Certainly footwork drills are great, but it is better to have goal driven footwork drills. For example, a plausible drill here is to have two participants diametrically opposed across the circle. The first cuts with a dussack, the second triangle steps right with a hanging guard, then completes the double triangle with a cut of their own. The first fencer defends with a hanging and triangle step, and so on, circling each other.
This paired drill in which one person evades and counter-cuts with a double triangle step is far more useful in demonstrating how and when the stepping should be used than hours of mindless drilling of footwork in isolation.
Wow, just found your site and I’m really impressed! I would love to see you apply these same animations to the rappier diagram (just for comparison sake as the rappier one is just a more detailed ‘slice of the pie’). I have only a slight variant interpretation on the ‘Stolen Step.’ After the rear foot is brought forward it can then make a single triangle (either to the left or right) in order to move offline for a strike or for defense.
Again, love the site!
-Robert Rutherfoord
I just realized that those are footstep. Haha. Thank you for posting.
Hi!
This article is a really cool reference, but unfortunately many of the pictures no longer load. Can this be fixed?
Thanks for letting me know! Hopefully it’s working now.